GitHub: How to Create a README with Statistics for your Profile

In late 2020, GitHub released a new feature which allows users to create a README file for their profiles. This file is quite useful especially in marketing yourself. You can put an introduction about yourself, your work, skills, experiences, and more. Some people also put their GitHub statistics, which I will show you how to do in this article.
The statistics that will be shown will be an overview of your GitHub account. It shall display information such as total stars, forks, repository views, languages you used, and more.
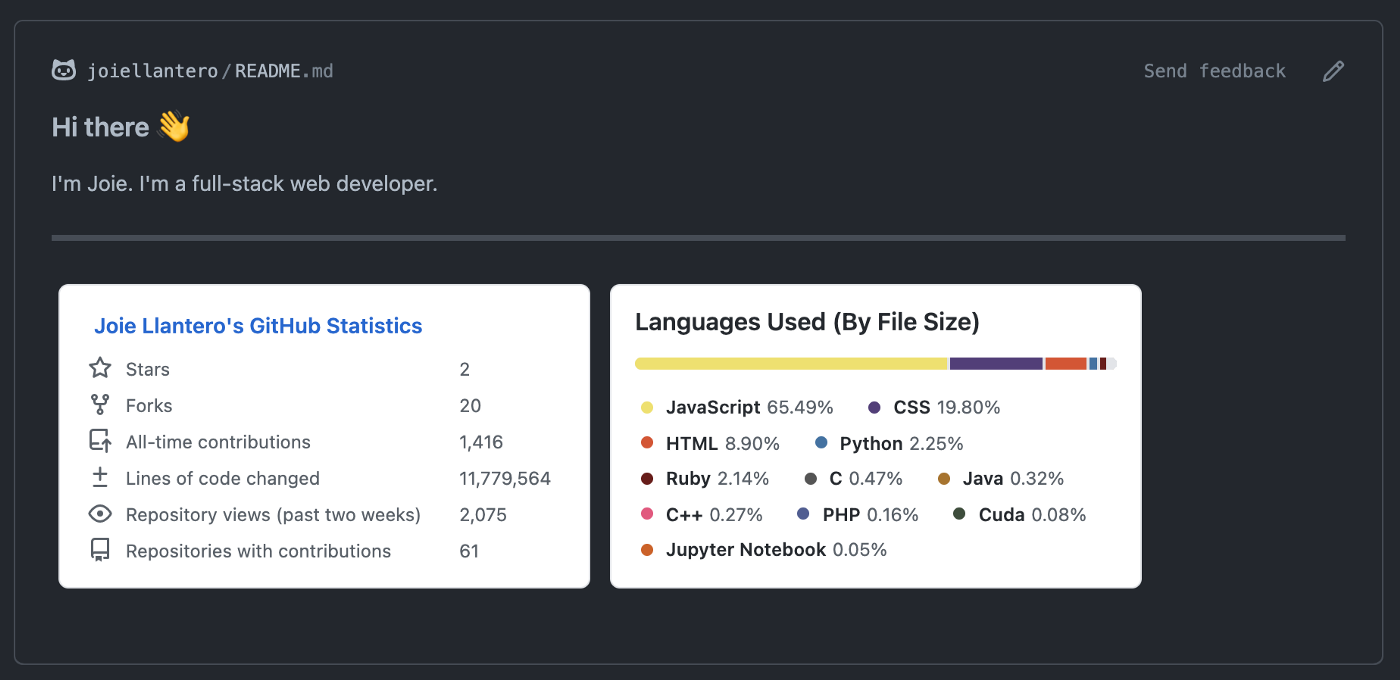
A sample README.md for a GitHub user’s profile
Creating your GitHub Profile’s README.md
-
Go to this link to create a new GitHub repository.
-
Use your username as the name of this repository like what I did in the image below.

Create a new respository.
Take note that GitHub is warning me because I have already created my own repository for the README file. In your case, there should be a green checkmark in the right side of the text box.
-
Initialize your new repository with a README file.

Check the "Add a README file" option.
-
GitHub auto-generates the content of this README into something similar shown below.
### Hi there 👋

<!--
**joiellantero/joiellantero** is a ✨ _special_ ✨ repository because its `README.md` (this file) appears on your GitHub profile.
Here are some ideas to get you started:
- 🔭 I’m currently working on ...
- 🌱 I’m currently learning ...
- 👯 I’m looking to collaborate on ...
- 🤔 I’m looking for help with ...
- 💬 Ask me about ...
- 📫 How to reach me: ...
- 😄 Pronouns: ...
- ⚡ Fun fact: ...
-->
If you’re not familiar with markdown, here are some resources for you to check out:
-
Edit this to your liking, and don’t forget to commit (and push if you’re not using GitHub’s web interface) your changes!
Generating your own statistics
-
Visit this link and follow the installation instructions written on README.md.
-
After the workflow is done, go to the “generated” folder. You will see two files like the ones below.

Go to the "generated" folder -
Click on them and copy the URL leading to the image. Remember not to use “raw”. This is because we want the link to the image and not the SVG code itself.

Copy URL of the languages.svg -
Go to the repository you created earlier and open up the README.md file as we will now display the SVGs using the link that you copied.

In my case, it would look something like this:

 -
Commit (and push if you’re not using GitHub’s web interface) your changes and checkout your new GitHub profile!
-
Share this with others if you liked this tutorial.